Thursday, 19 July 2012

Peyote Instructions

Although peyote is a basic beading stitch, it takes lots of practice in different manifestations of projects to gain true mastery over all of its forms and capabilities.  In this post I have collected some links to the best descriptions I can find of the techniques needed when constructing a beaded peyote bead. Personally I find I learn best by seeing the animation, having picture references, and trying samples as I go, but everyone has different ways of individualizing their learning.
Animations are a great way to understand a stitch.  Here is a link to some animations for basic flat peyote.  It is really important to understand the flat peyote first, and the concepts of up "up beads" and "down beads":
Silverhill Designs: even and odd count flat peyote animation
Click the triangle on each little screen to start the animation. There are also links to some nice but fairly easy patterns.
Here is a good flat even count peyote diagram from Suzanne Cooper, who has an excellent website with lots of free patterns and instructions:
Suzanne Cooper's peyote diagram

A step up is used in tubular peyote.  Tubular peyote is the stitch used for some beaded beads and for amulet bags. Here is a picture of that the step up looks like: From About website
Below is a picture of a step up in action as the last bead is added to a row.  Basically to do a step up you go through 2 beads:  the usual "up" bead to create the last stitch, then through the first bead you added in that row.  When learning step ups it is much easier if you use different color beads until you learn to recognize the pattern.  Occasionally missing the step up is a really common mistake, even for experienced beaders.

Finally, below is a link to a video showing tubular peyote and a step up.  There are also written instructions in detail below the video. Tubular video
If you are doing a larger project based on tubular peyote, this free tutorial from i-beads explains how the starting point moves diagonally across the beading chart.    There is also a good chart for a step up in step 5.
peyote tutorial from i-beads.

So, I hope these links will help increase skills and comfort level with tubular peyote, and a successful beaded bead. 

Wednesday, 18 July 2012

Beaded Beads and I'm Beading Again


I didn't bead much this winter because I got hooked on machine embroidery and was also back to my porcelain doll reproductions, but I seem to have the beading bug this summer  and will  do some posts again. There are so many wonderful bead blogs that mine seems pretty ordinary, but I was astounded the last time I checked my stats, so I guess I have a few readers.

I love doing beaded beads and recently offered to teach one for my beading group.  I have made many beaded beads but often just end up throwing them in a jar, because although I enjoy making them I just don't always get around to making something with them.  My challenge to myself was to create at least one usable item from some of by beaded beads as one of the things I showed the group.

I have taught beading informally to friends over the years, but until I started in this beading group my beading social networks were mostly the internet and beading books and magazines.  It has been great to meet with others who like to bead. For the workshop, I developed what I thought was a reasonable set of  instructions for a beaded bead with a wooden internal centre done in circular peyote.  Well...... je me trompe!!

Although these little structural wonders are fairly easy once you get the hang of them, for the type we made knowledge of circular peyote, and of how peyote works in general is really important.  After a few minutes into the workshop I realized that this foundational knowledge was needed (and in my instructions I had assumed people had circular peyote experience), so unfortunately I think some people left a little frustrated.  So, I stewed over what to do, feeling I had let them down (and remember that my professional expertise was as a teacher, so maybe I had really lost it!!)

So after getting over my ruminations of what had gone wrong,  I redid my instructions into what I hope is a "teaching" set, where more detail is given and things like step ups and reductions are explained.  I also am making a larger set of teaching beads (I might even use straws and yarn!!), so I hope to have more happy campers when we meet next week.

The brown beads above were made from a pattern on  Flymouche's blog called "La Boulette" and her French instructions are terrific if you understand circular peyote.  Here is a link to her site FLYBLOG.  The pattern is in the archives for August 2009, but please have fun looking at her wonderful blog.  The necklace is what I made for my challenge.  The central bead is from Beadwork beaded bead #2 in the "Cluster Beaded Bead" by Gwen Fisher, April May 2012 issue.  It is really nice.  A little complicated, I think I have way more thread because I got mixed up and had to get back to the right node a few times, but this is the second one I have made and I really like it.

In my next post I will add some links for my bead group about circular peyote and step ups.

Tuesday, 13 September 2011

The "Lard 'Tunderin Jesus" Bead

I just received my copy of the latest Beadweaving Master Class series from Lark Publishing, Maggie Meister's Classical Elegance. This is a terriric book with many useful techniques and projects.  I was fortunate to have been able to take a class with Maggie and she is a real inspiration for beaders looking for a both new ideas and challenges.  I chose the "kilim" beaded bead for the first project to make out of the book.  
So why is this post titled as it is?  There is a well known cartoon in Canada where I live in which a canoe is....well, see the cartoon. The caption is usually "Lard 'Tunderin Jesus!", an oft heard expression in the maritimes from which I hale.


This bead has a very intricate construction, with a framework built first and brick stitch panels added into the structure.  The framework went fairly easily, although I admit having had the class with Maggie it helped that I understood some of her construction methods.  The first two panels went in easily once I reviewed brick stitch, a stitch which I like but don't use as often as others.  The third panel was getting a touch more difficult due to the overall space between the ribs.  When I finished the first half after a few ripouts I sat back to admire my progress when I noticed that there was a rib behind that I had missed. 
So I ripped out again, attached the panel to the right rib, and eventually finished the bead.  This was a terrific project, and this is a must have book for serious beaders.I apologize for the strings remaining, but as usual with beaded beads I love making them but they often sit in my beaded bead jar for admiration before they get made into something useful!
Anyway, I hope this gives all you beaders something to chuckle about today!


Wednesday, 18 May 2011

Loomwork with Delicas

My interest in loomwork continues.  I love the evenness of the loomwork, and am still addicted to the little pop as the beads slip into their place in between the warps. This is a bracelet adapted from a Bead and Button pattern "Capture the Spirit of the Victorian Era with Floral Patterns" for a split necklace by Jennifer Creasey.
The little rose motif is easy and quite nice in terms of how the colours of the rose make the image seem natural. I continue to be thwarted by the warp ends.  I tried to sew these in but finally resorted to gluing a piece of fabric to the threads.  I have signed up to be in the Bead Interventions group on Facebook and am hoping I to learn some better ways to deal with the ends.  In the photo below I added a three bead picot edge with size 15 seedbeeds and the overall effect is very dainty.

Our regalia pieces for the project are coming along very rapidly.  The students doing the loomwork are getting quite fast, and seem to enjoy it.
My little homemade loom works very well, and now I am giving it to the artist mentor to do her next regalia piece, so I am working on my next prototype. 

Monday, 2 May 2011

Loom Work Pendant

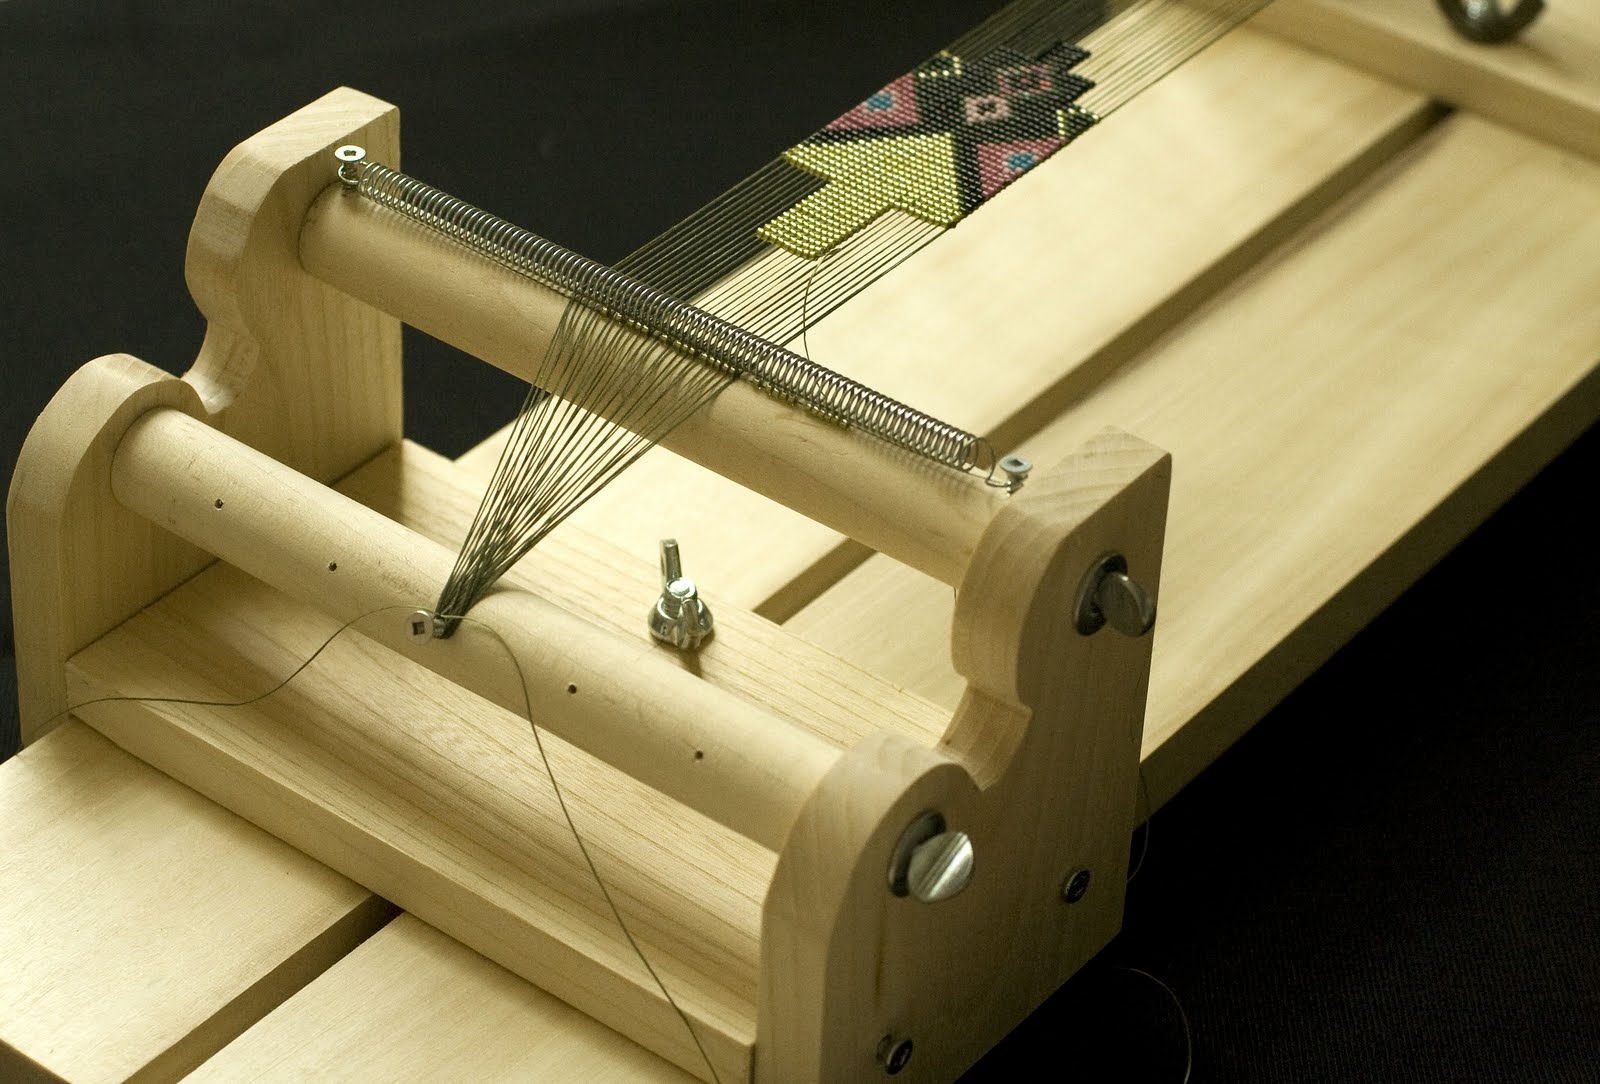
This is a picture of my homemade loom with a pendant started on it.  After looking at pictures of various looms, and also understanding that you can warp a loom in a way that you don't have ends to deal with, I designed this one with the help of my very talented husband.  There are still some tweaks to do on the design, but overall it works really well and can be used with various techniques.

I learned a technique for doing the warp from the artist mentor who is leading the beading project.  She uses one continuous thread rather than tying off individual threads.  I have tried to use a no  end warp technique as well, but although the concept works, the actual process is so far a lot of trouble, and I am not happy with the tension, so I have done my first 2 projects with the traditional approach (which means a lot of ends to deal with afterwards!)

This pendant is a project by Heidi Kummli from Bead and Button  October 2005, p. 116. The patterns has two variations, both of them lovely.  I beaded the piece with no problem.  The backing technique used masking tape, and I was not hapopy with result, so I took that off and developed my own way of gluing the ends onto lightweight interfacing, then backing the whole piece with ultrasuede.  That worked well.  I used more info from Heidi's book to help with the finishing, and overall it is a very attractive pendant.

I really enjoyed the loomwork, and have another project to post soon.  Because I had lots of warp thread, I was able to do a little pair of matching earrings on the same warp.
Another helpful book in terms of the actual loom technioque was the one by Margie Deeb entitled Out on a Loom, ( which is not readily available but I found one in a remainder sale.)  It has good info on necklaces and how to deal with increases and decreases.


That's all for now folks, I have one more loom piece coming soon.